This article originally appeared in the July 1993 issue of the newsletter of the British Othello Federation. That issue of the newsletter was entitled 40 Billion Nodes Under the Tree. I have made a few tweaks below, but the article is essentially unchanged. (I'll see if I can improve the quality of some of the images below sometime!) Note that computers were a lot slower in those days!
A great deal of excitement preceded the long awaited three game match between Amenor and Urakam, two players known to play almost perfectly. The match produced three games of exceptional quality.
Computer analysis reveals that Amenor made no errors, while Urakam's move 2 in game 1 and move 5 in game 2 cost him one disc each. In game three, play was perfect from move 2 onwards.
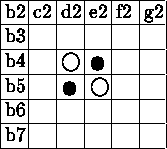
Notation. In the following notes, the columns are labelled b to g, and the rows are labelled 2 to 7, so that the moves in standard openings have their usual names. Colours are red and white, with red playing first. Interest in 6x6 Othello is on the increase, because there are plans to market the game, targeted at the 5-8 age range. It seems that the game is playable, and incorporates many, though not all, of the interesting features of the full game.
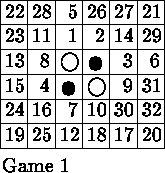
Red: Amenor 17, White: Urakam 19
The first surprise of the match came with Urakam's choice of 2.e3, the parallel opening, commonly held to be inferior. At move 5, the usual move in eight by eight Othello is at f3, but this is an x-square, so instead Amenor initiates play on the North edge. White now has little choice but to grab the East edge. Many onlookers now liked the look of the move 7.f5, but computer analysis reveals that after the optimal moves 8.g5 c4 b4, Red has no good way to break the long flat White wall, and White wins 20-16. Amenor's choice of 7.d6 was more accurate. Play is then fairly natural until Amenor's brave diagonal grab at move 11. Urakam played the waiting move 12.d7, but after 13.b4 he was forced into an x-square of his own. 14.e2 would lose to 15.f6, while 14.f2 loses to the Stoner trap 15.e2. In the game, after 16.c6, Amenor allowed the Stoner trap on the South edge but ensured his own access to g2. The players then captured the four corners on consecutive moves. Unfortunately for Amenor, White's threats in the North are too strong. In the end Urakam was able to play both e2 and c2, and Amenor did not even gain parity, as the two regions in the East were linked. These regions did, however, play quite well for Amenor, and he was able to keep the loss to 17-19.
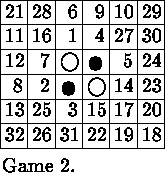
Red: Urakam 15, White: Amenor 21.
In game two, the players played down the main line of the Rose opening up to move 5, but Amenor avoided the x-square 6.c6 in favour of the aggressive sequence 6.d2 c4 b5 e2 f2. Now 11.c3 looks natural, but Urakam chose not to sacrifice the b2 corner. At move 14, g4 looks strong, but Red could then play the sacrifice at c3. This turns out to be a 19-17 White win, but Amenor wanted more! After 14.f5 e6, Amenor grabbed the diagonal with 16.c3.
![]()
![]()

![]()

![]()
![]()
![]()
![]()
![]()
![]()
![]()
![]()
![]()
![]()
![]()
![]()
![]()
After 16.c3.
This diagonal grab is extremely strong, as it prevents Red's f3, and threatens c6. If Red tries 17.g5, he never gets on the diagonal after 18.e7! (White wins 26-10).
In desperation, Urakam tried 17.f6!, following the ``principle of the opposite x-square'';. This huge sacrifice guarantees Red's access to b2. But Amenor cleverly denied Urakam access to c2, preventing him from working along the North edge until it was too late. Note that 22.g5 loses to 23.g4, gaining access to c2. After 25.c6, b7 and c7 are equally good, but c7 is more spectacular, with its follow-up 28.c2.
Ahead on disc-count, Amenor chose white for the deciding game.
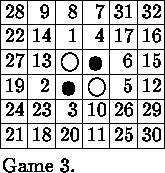
Red: Urakam 16, White: Amenor 20.
At move 5, Urakam chose a different variant of the Rose opening, and play proceeded down the most common line until move 9, when Urakam grabbed the North edge. After 10.e6 it looked as if he was in trouble, but the dramatic centre grab 11.e7 turned out to be quite strong. Both players were rather short of moves, and it was clear that an x-square was imminent. Amenor took the initiative with 14.c3! As often, this diagonal is very hard to cut. Urakam did not even try, and at move 17 he sacrificed at f3.
![]()
![]()
![]()
![]()
![]()
![]()
![]()
![]()
![]()
![]()
![]()
![]()
![]()
![]()
![]()
After 17.f3
The position was now extremely tight. Neither side could cut the other's diagonal in a satisfactory way. After Red's waiting move to b5, Amenor played the surprisng 20.d7. After 21.b7 b3, the point is not that Amenor was on the diagonal, but that Urakam could not cut the other diagonal, and also that Amenor was certain to keep parity in at least three of the four regions. Note that this time the opposite x-square 25.f6 would be no help after 26.g7. Amenor had enough for a 20-16 win, giving him the championship. Congratulations to him.
In case you are wondering, the characters Urakam and Amenor are fictional, but the computer analysis is genuine. The six by six version of my program MODOT, running on the Nottingham Mathematics department's Silicon Graphics crimson chip, took about two weeks cpu time to show that the sequence in game three above is optimal. It had to look at about forty billion positions. Previously, the win, loss or draw calculation had taken about 1.5 weeks and thirty billion nodes to show that White was winning at move 2. The program used short mid-game searches to order the moves for its endgame calculation to look at. Usually this was sensible, but some of the corner sacrifices looked at were daft. On the other hand, the optimal lines do include a lot of early x-squares. I would not recommend an x-square at move 2, though! The diagonal opening is an easy win for Red.
The following opening tree is enough to guarantee that White is winning after three moves each. I do not claim that White's moves are optimal. Also, the win after d3 c5 b6 e3 d6 c4 b5 is very hard to find! (This line is not optimal for White).
d3 c5 b6 e3 f5 e6f4 d2
d6 c4
f2 d2
f6 d2
f3 d2
c6 e3 b5 d2
c4 b5
f5 d2
f3 f4
d6 e3 b4 d2
f4 d2
b5 d2
f5 f4
f3 e2
e6 d2 c2 b2
c3 e3
c4 b5
b5 f4
c6 f4
f6 d2 c4 b5
c3 f5
c6 f5
c2 b2
b5 f4
Further information: if after 2.c5 Red tries 3.e6, White can win by more than 4 by playing the ganglion, 4.d2. But if White plays 4.f5 instead, Red must play the Italian 5.c4, and it's a draw: perfect play is then 6.e3 f4 g5 g4 g3 f6! d6 b5 g7 e7 c6! b7 d2 d7 f7! g6 f3 g2 c7 f2 e2 c3 b6 c2 b2 b3 b4 18-18.
I have credited empty squares to the winner, as in tournaments. It is possible that there is a line where Red can hold the loss to 16-17. I do not intend to use another 2 weeks cpu time to find this out!
For the perfect play sequences in 6x6 Othello with both the standard or the alternative reversi starting position, see the solution to 6x6 Othello as it was originally stored in Paderborn